We are presently exploring a faster hybrid method of stone masonry, in which we stucco over salvaged cinderblocks for the bulk of the wall, and blend in slipform stone masonry for a touch of the stone look. We hope to build a classroom/barn with this method at some point. |
Stone Masonry Classes
with Builder and Author Thomas J. Elpel
Stone houses have both enduring and endearing qualities about them. There is an aura of timelessness about them, as if they have always been there and always will be. Perhaps this feeling of timelessness is exuded from the rocks themselves. Building with materials as old as nature makes a home seem as if it were part of the story of the land.
 The method of stone masonry we use is called "slipforming." Short forms, up to two feet tall, are placed on both sides of the wall to serve as a guide for the stone work. You fill the forms with stone and concrete, then "slip" the forms up for the next level. Slipforming makes stone work easy even for the novice.
Slipforming is an old-fashioned style of masonry, resulting in a random or "rubble-stone" appearance, without the uniform joints or sharp, clean lines of most modern masonry. In fact, slipforming is comparatively messy, and you will often find cement drips permanently adhered to the face of the rocks when you remove the forms. But these stains also contribute to the "patina" of the stone work, giving it an "antiqued" appearance.
 Tom's article The Art of Slipforming was featured in the January 1997 issue of The Mother Earth News magazine. We received more than 150 letters from people enthusiastic to learn slipform masonry first-hand. Those who are familiar with the slipforming process wrote to tell us the article was a significant advancement over the available literature on the subject. That article and much more are included in Living Homes: Stone Masonry, Log, and Strawbale Construction.
Looking for some hands-on stone masonry and building experience? We are always building something, working with recycled (often free) materials, and innovating new building methods. If you are interested in getting involved for a week, a month, or a year or more, please click over to our Green University®, LLC Immersion page.
-A few of our Stone Masonry Projects-
Slipform Stone House
Class Project: 2005 - 2009
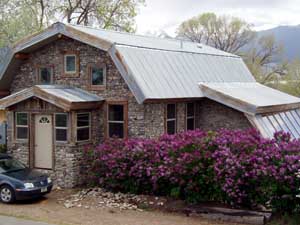
The era of fossil fuels is coming to an end, but we cannot merely substitute other fuels, such as firewood to make up for the loss of fossil fuels. That isn't sustainable either. The only truly sustainable option is to make every new building so energy efficient (and to retrofit every existing building) such that we will not need any energy other than sunshine to keep them cozy. But some would argue that houses built to that standard would be cost-prohibitive, much more expensive than a traditional, energy-wasting home. I disagree.
Having built our own reasonably energy-efficient, mostly passive solar stone and log home for $10 a square foot in the 1990's, I found myself wondering, "Is it possible to achieve 100% passive solar heating on a shoestring budget?"
In April of 2005 we broke ground on construction of a new energy-efficient stone house originally intended as student housing for our Green University® LLC immersion program Our hope was to build a structure that is fully passive solar, with no need for wood, gas, or electric heating... although I planned to include a fireplace for insurance, comfort, aesthetics, and to help dry the air out as needed. [Read More...]
Slipform Stone Workshop
Class Project: June 2001
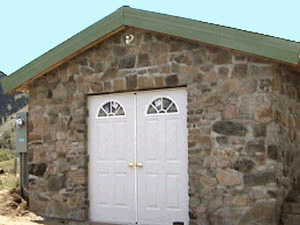
A new stone workshop in just one month! Robert arrived here from New York City on June 4th to learn stone masonry. We went to work immediately setting forms to pour the footings and the slab. Exactly one month later--on the 4th of July--we put on the metal roof! Along the way we somehow shot video of the entire process, and still took a couple well-deserved days off. The building is 12 feet wide and 16 feet long, as measured on the inside.
The original idea behind the project was simply to create a storage shed for our camping gear and bicycles. But we couldn't just build any old shed... it had to look good beside our stone house, and that meant building the shed with matching stonework and the same kind of roof. And since we were building with stone, I also wanted to test out some ideas which I had previously proposed, but never actually tried-- that is, framing the entire structure with insulation panels, then slipforming the stonework up the outside. In other words, this would be a pretty elaborate and highly insulated storage shed!
 Soon we added cute little windows to the plans for the south wall, with more windows in the doors, plus complete wiring and lighting inside. We started thinking "workshop" or even "studio" more than "shed". Ultimately we may have to build something else to hold our bicycles and camping gear...
To read more about the workshop and video click here.
A Slipform Stone Wall
Class Project: Fall 1998
In the fall of 1998 we built a slip-form stone retaining wall to stop the hill from eroding onto our patio. Six participants joined us from places as far away as Missouri, Washington, Nevada and Arizona. We are deeply grateful for all of their help. We have always done these projects by ourselves, so this was a new experience for us too.
 Although there was little formal structure to the workshop, participants learned to gather stones, set forms, mix concrete and build stone walls. Other skills included hammer-drilling, cutting and tying rebar, and grouting the stonework.
The front of the retaining wall is faced with stone, with poured concrete on the back-side. We painted over the concrete with tar and back-filled it with earth. We also buried a 400 gallon water tank behind the wall to store rainwater collected off the roof of the house. The water is used in the garden bed on the patio. Later we planted an apricot tree there, where it gains extra warmth from the wall behind it.
Follow these links to see more pictures of the wall, plus grouting the wall, and the crew, more crew that built it, and the finished wall (as seen from the roof) click on the links, then use the back arrow on your browser to return here.
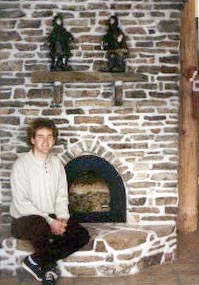
Our Masonry Heater or Russian Fireplace
Our big masonry project for 1997 was the construction of a "Russian" masonry stove, or in our case, a "masonry fireplace". Masonry heaters originated in Europe. The stoves are designed to burn a hot fire, with the air supply and chimney damper wide open. This results in a clean burn, with little visible smoke. The distinctive feature of the heaters is a series of baffles to pull the heat out of the exhaust. The masonry absorbs the heat of the fire, then radiates it gradually back into the room. An article about Masonry heaters was featured in the October-November 1994 issue of The Mother Earth News.
We studied many designs, including the commercially available kits made from refractory cement, and decided none of them were quite matched to our situation, so we designed and built our own. We built the firebox and the baffles out of standard fire brick, and layed up the stone by hand. The masonry style we used is different and much more time-consuming than our usual slip-forming work, but gave more of the effect we wanted in this project. Years of slip-forming experience gave us the necessary skills to lay up the fireplace by hand.
A chapter on Masonry Stoves is included in Thomas J. Elpel's Living Homes: Stone Masonry, Log, and Strawbale Construction. Also be sure to read Masonry Stoves: A Brief Overview
Interested in more classes and events?
See our full schedule!
Looking for an extended immersion experience at a discount price?
Join us for a semester or a full year!

Check out Living Homes: Stone Masonry, Log, and Strawbale Construction.


 Green University® LLC Trademark


 The method of stone masonry we use is called "slipforming." Short forms, up to two feet tall, are placed on both sides of the wall to serve as a guide for the stone work. You fill the forms with stone and concrete, then "slip" the forms up for the next level. Slipforming makes stone work easy even for the novice.

 Although there was little formal structure to the workshop, participants learned to gather stones, set forms, mix concrete and build stone walls. Other skills included hammer-drilling, cutting and tying rebar, and grouting the stonework.

